pytorch入门笔记及资源集合
安装配置支持Cuda的pytorch
- 参考教程
- conda显示所有源
conda config --show
- conda添加国内源
conda config --add channels <网址>
- conda删除源
conda config --remove channels <网址>
- 清华源网站清华源
- 下载Cuda tool kit网站
- 安装后在命令行输入
nvcc -V测试是否安装成功 - 安装后下载对应版本的cudnn网站
- 将cudnn解压缩之后,
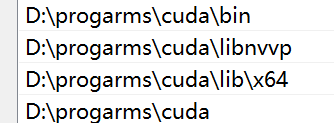
bin,include和lib文件夹下的内容分别复制到cuda toolkit的安装位置下 - 在系统环境变量PATH中添加安装位置下的
./bin,./libnvvp,./lib/x64和toolkit安装位置本身 - 检查系统环境变量中是否有
CUDA_PATH和CUDA_PATH_V12_4(替换为自己的版本号)- 在设置之前务必删完之前版本留下的环境变量

- 要保证系统环境变量的用户变量中的path和系统变量中的Path,以及系统变量中的
CUDA_PATH和CUDA_PATH_V12_4存在
- 之后找到安装位置下的
.\extras\demo_suite下面的bandwidthTest.exe和deviceQuery.exe, 分别在命令行执行上述程序,看到Result=PASS表示成功 - 使用
pip安装torch,去官网查看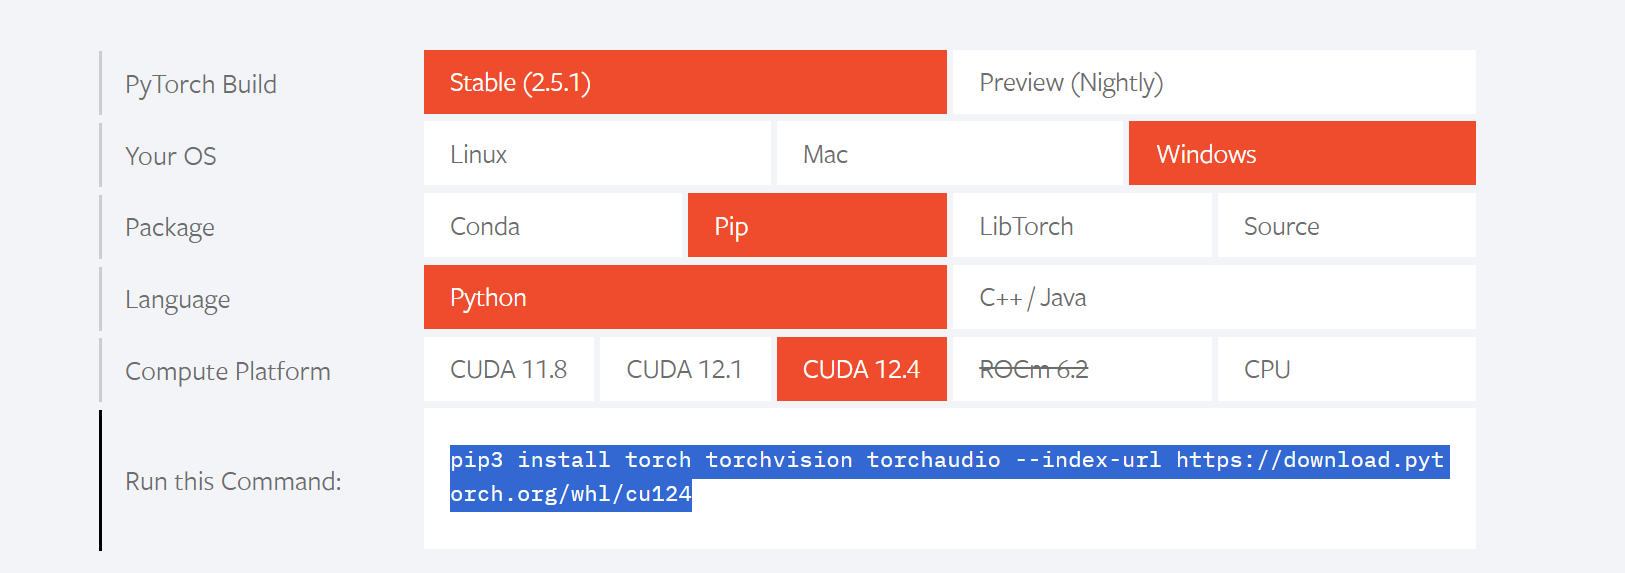
pip3 install torch torchvision torchaudio --index-url https://download.pytorch.org/whl/cu124
- 使用conda安装,可能因为不清楚的原因导致
torch.cuda.is_available()返回False,使用pip安装解决问题- 安装过程中,使用命令
conda install pytorch torchvision torchaudio pytorch-cuda=12.4 -c pytorch -c nvidia可能因为网络(或者服务器)原因报错链接失败,此时关闭代理即可成功 - 使用pip安装成功,并且可以使用
cuda 
- 安装过程中,使用命令
教程手册
莫烦 https://mofanpy.com/tutorials/machine-learning/reinforcement-learning/
pytorch中文手册
https://handbook.pytorch.wiki/
转移到GPU上训练
- 参考
- 参考2
- 主要操作是判断系统是否支持GPU训练并且指定设备
devicedevice = torch.device("cuda:0" if torch.cuda.is_available() else "cpu") # 设置使用GPU计算
- 对创建的模型执行
module.to(device) - 对创建的
torch.tensor()也执行.to(device) - 注意,CPU上的参数只能和CPU上的参数互相运算,GPU上的参数只能和GPU上的参数互相计算,不能混杂,混杂的时候需要都迁移到GPU上计算或者都迁移到CPU上计算
- 假如网络已经迁移到了GPU上,那么网络的输入参数也需要是GPU上的Tensor,输出也是GPU的
detach函数
https://blog.csdn.net/qq_31244453/article/details/112473947
返回一个新的tensor,从当前计算图中分离下来。但是仍指向原变量的存放位置,不同之处只是requirse_grad为false.得到的这个tensir永远不需要计算器梯度,不具有grad.
某博主的DDPG
https://blog.csdn.net/blanokvaffy/article/details/86232658
网络保存与加载
https://blog.csdn.net/weixin_41680653/article/details/93768559
torch.mean()
mean()函数的参数:dim=0,按行求平均值,返回的形状是(1,列数);dim=1,按列求平均值,返回的形状是(行数,1),默认不设置dim的时候,返回的是所有元素的平均值。
torch的zero_grad()函数
调用backward()函数之前都要将梯度清零,因为如果梯度不清零,pytorch中会将上次计算的梯度和本次计算的梯度累加
torch tensor的view函数
view(*args) → Tensor
返回一个有相同数据但大小不同的tensor。 返回的tensor必须有与原tensor相同的数据和相同数目的元素,但可以有不同的大小。
参数是-1的时候这个维度的长度从其他维度推算
torch tensor的 sequeeze和unsqueeze
squeeze():
squeeze(arg)表示第arg维的维度值为1,则去掉该维度。否则tensor不变。(即若tensor.shape()[arg] = 1,则去掉该维度)
unsqueeze():
unsqueeze(arg)与squeeze(arg)作用相反,表示在第arg维增加一个维度值为1的维度。
matplotlib画图的时候出现横坐标标签重叠的问题
比如
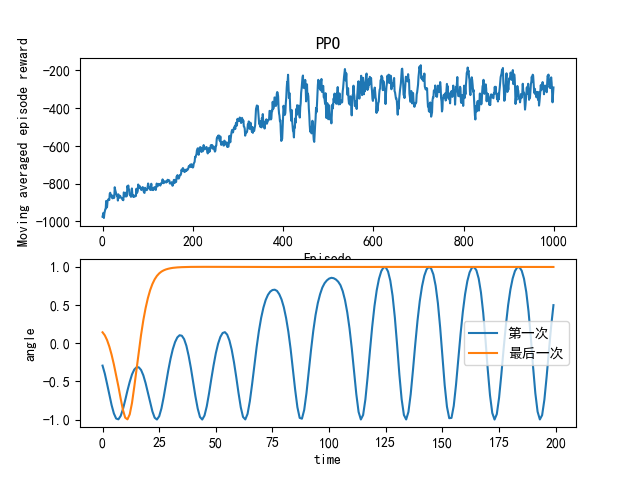
只需要在代码中加入
plt.tight_layout()即可(在plt.show()之前)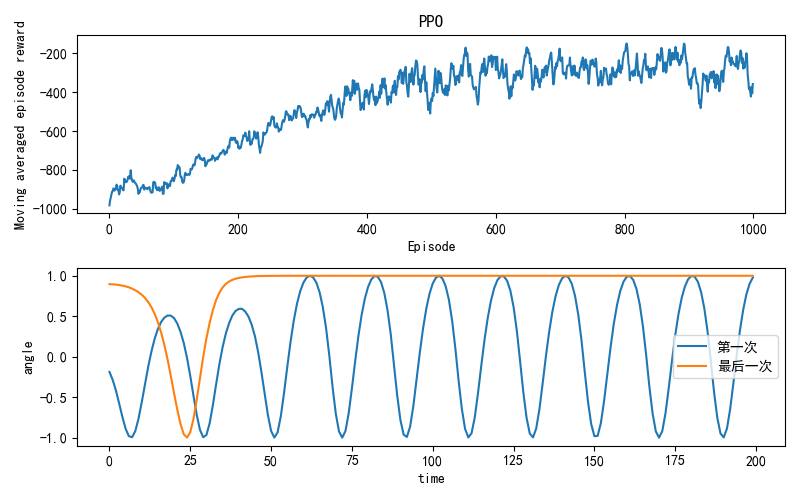
matplotlib添加希腊字母的latex方法
plt.ylabel("cos("+r'$\theta$'+")"),希腊字母用r'$\希腊字母$'即可效果:

将gym的输出保存为gif动画
def saveAsGIF(frames): |
- 此外,还需要在创建gym环境的时候进行一些操作(此处新版的gym和旧版的不太相同)
env = gym.make('Pendulum-v1', render_mode="rgb_array")
frames = []
for i in range(N):
frames.append(env.render()) - 然后再将
frames当作参数传入前面的函数saveAsGIF()中 
python中的
@- 参考链接
python中的
None - 参考链接
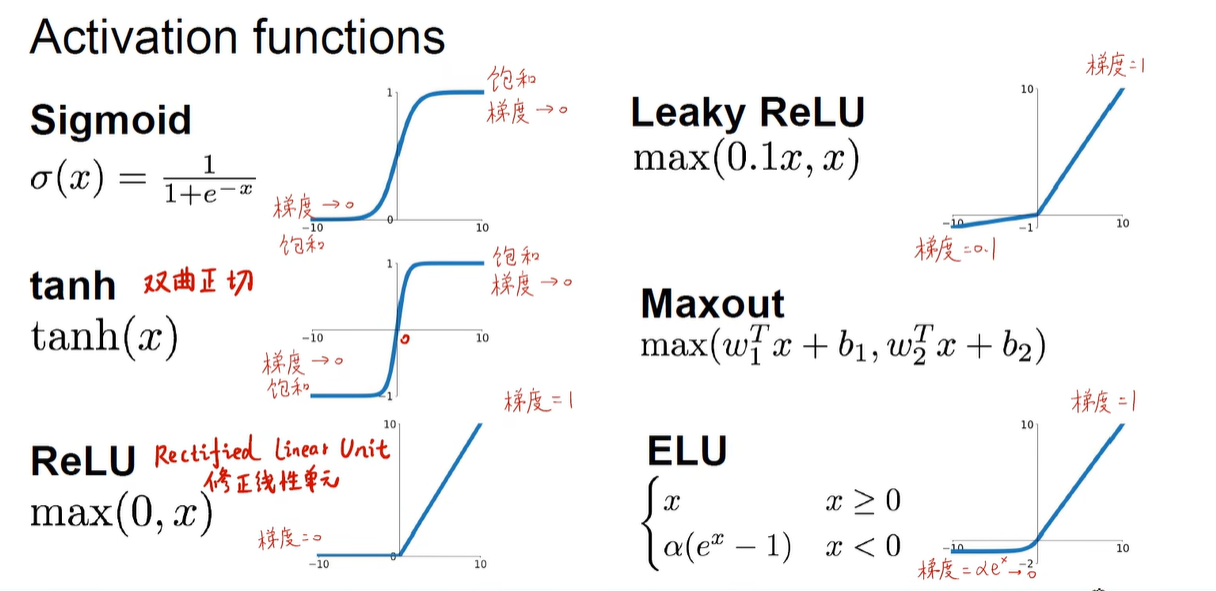
- 激活函数
- 其他的激活函数(比如
Leaky ReLU) - 参考链接1
- 参考链接2
- 简而言之就是比如使用
sigmoid函数作为激活函数,因为sigmoid函数的梯度小于1,导致随着反向传播的层数加深,往前的层因为连乘的sigmoid函数导数次数过多,使得梯度越来越小,实际上起不到任何的训练效果,网络实际有效的只有靠后的几层。 - 也有其他方法来解决梯度消失的问题,比如ResNET等等
Jetson开发板上找不到
libomp.so文件的解决办法 - 在Jetson开发板上安装
pytorch之后,import pytorch的时候报错找不到libomp.so文件 - 但是同样的代码在命令行手动使用
python3 <文件名>就可以执行 - 此时可以通过安装
sudo apt-get install libomp5 libomp-dev解决,参考python实现命令行进度条
- 参考
python从图片生成gif
- 参考


 ,此时可以通过以下几步解决问题