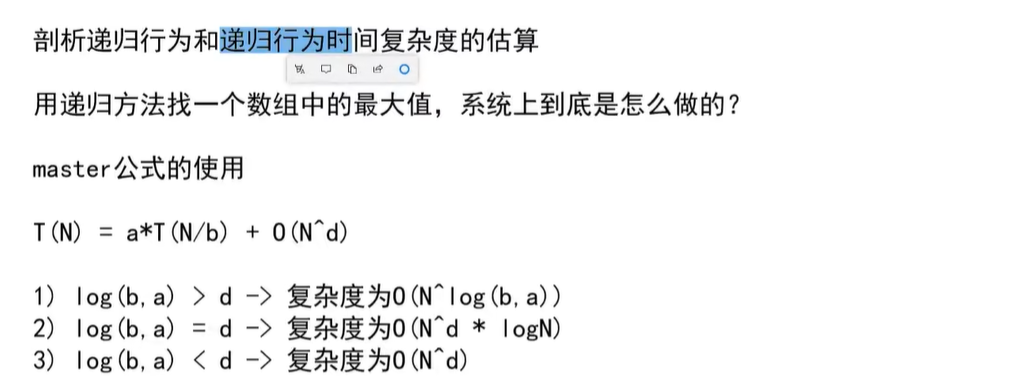
0%

zuochengyun参考链接

时间复杂度的计算

  • 图 1

    稳定性

  • 数组中相同的元素在排序前后的相对次序有没有变化?没有就是稳定的。
  • 语言为java,但是因为与C++类似,所以没有专门更改
  • 交换函数
    • 位运算的交换函数
      a = a^b;
      b = a^b;
      c = a^b;
  • 普通交换函数
    public static void swap(int[] arr, int i, int j) {
    int tmp = arr[j];
    arr[j] = arr[i];
    arr[i] = tmp;
    }

    选择排序

    public static void selectSort(int[] arr) {
    if (arr == null || arr.length < 2) {
    return;
    }
    int N = arr.length;
    for (int i = 0; i < N; i++) {
    int minValueIndex = i;
    for (int j = i + 1; j < N; j++) {
    minValueIndex = arr[j] < arr[minValueIndex] ? j : minValueIndex;
    }
    swap(arr, i, minValueIndex);
    }
    }
  • 时间复杂度O(N^2), 空间复杂度O(1),稳定
  • 思路:大循环确定每次排序的第一个位置,每次确定一个数字,确定的方法是从还未确定的范围里选出一个最小的数字,将这个数字与排序的第一个位置原来的数字交换位置,然后确定该位置的数字,将排序的起始位置前移一个

    冒泡排序

    public static void bubbleSort(int[] arr) {
    if (arr == null || arr.length < 2) {
    return;
    }
    int N = arr.length;
    for (int end = N - 1; end >= 0; end--) {
    for (int second = 1; second <= end; second++) {
    if (arr[second - 1] > arr[second]) {
    swap(arr, second - 1, second);
    }
    }
    }
    }
  • 时间复杂度O(N^2),空间复杂度O(1),稳定
  • 首先从数组的第一个到最后一个元素执行一次冒泡,冒泡的具体行为是假如数组下表前一个位置的数字比下表位置的数字大的话,交换这两个数字,然后一次冒泡结束之后将冒泡行为的后边界前移一。

    希尔排序

  • 希尔排序(Shell Sort)是一种基于插入排序的高效排序算法。它通过比较和交换非相邻的元素来实现部分排序,从而逐步减少间距,最终达到全局排序的目的。时间复杂度在O(nlogn)O(n^3/2)
  • 选择增量序列:选择一系列递减的增量(如 n/2, n/4, …, 1),其中 n 是数组的长度。
  • 分组并排序:对于每个元素,这个元素一次往前回退增量个步长,按这个步长执行插入排序(如果当前位置-步长位置的元素大于当前元素,就交换这两个元素)
  • 缩小增量:依次缩小增量,重复分组和排序的过程。
  • 完成排序:当增量缩小到1时,进行最后一次插入排序,最终完成排序。
    // 希尔排序函数
    void shellSort(std::vector<int>& arr) {
    int n = arr.size();

    // 初始增量gap,通常选择n的一半
    for (int gap = n / 2; gap > 0; gap /= 2) {
    // 从gap开始,对每个元素进行插入排序
    for (int i = gap; i < n; i++) {
    int temp = arr[i];
    int j;
    // 对当前gap分组进行插入排序
    // 以gap为间隔,向前移动元素直到前面元素不比他小
    for (j = i; j >= gap && arr[j - gap] > temp; j -= gap) {
    arr[j] = arr[j - gap];
    }
    arr[j] = temp;
    }
    }
    }

    插入排序

    void insertionSort(std::vector<int>& arr) {
    int n = arr.size();
    for (int i = 1; i < n; ++i) {
    int key = arr[i];
    int j = i - 1;

    // 将 arr[i] 插入到已经排序的序列 arr[0..i-1] 中
    while (j >= 0 && arr[j] > key) {
    arr[j + 1] = arr[j];
    --j;
    }
    arr[j + 1] = key;
    }
    }
  • 思路是从第二个元素开始,假如该元素比前一个元素小的话,就将这个元素向前移动,直到前一个元素不比这个元素小为止(类似于打扑克起牌的时候将大牌插入到前面,只不过是一次移动一个,而不是一次到位)。然后将插入元素的起始位置向后移动一个。
  • 时间复杂度O(N^2),空间复杂度O(1),稳定

    归并排序 2024-6-19更新

  • leetcode
    #include <iostream>
    #include <cstdlib>
    #include <vector>
    using namespace std;
    class Solution {
    public:
    vector<int> sortArray(vector<int>& nums) {
    return merge(nums, 0, nums.size()-1);
    }

    vector<int> merge(vector<int>& vec, int beg, int end)
    {
    if(beg == end)return {vec[beg]};
    vector<int> v1 = merge(vec, beg, (beg+end)/2);
    vector<int> v2 = merge(vec, (beg+end)/2+1, end);
    int i1 = 0, i2 = 0;
    vector<int> ret;
    ret.reserve(v1.size()+v2.size());
    while(i1<v1.size() && i2<v2.size())
    {
    if(v1[i1]<=v2[i2])
    {
    ret.push_back(v1[i1]);
    ++i1;
    }
    else
    {
    ret.push_back(v2[i2]);
    ++i2;
    }
    }
    if(i1<v1.size())
    {
    ret.insert(ret.end(), v1.begin()+i1, v1.end());
    }
    else if(i2<v2.size())
    {
    ret.insert(ret.end(), v2.begin()+i2, v2.end());
    }
    return ret;
    }
    };
  • 时间复杂度O(N*log(N))空间复杂度O(N),稳定
  • 思路就是将数组分为左右两部分,然后对左边和右边分别递归执行,执行之后回溯到这一层的时候,左右两个数组已经是各自有序的了,然后将两个数组进行合并(merge),合并操作就是将两个数组的下表设置为各自最前,然后将两个下标位置对应的数字中较小的一个放入总的数组中,该数组的下标前进一位。假如执行到最后有一个数组的下标到达了最后,就将这个数组整个衔接在总的数组末尾(需要用到额外空间)。

    链表归并排序 2023-10-30

  • leetcode
    /**
    * Definition for singly-linked list.
    * struct ListNode {
    * int val;
    * ListNode *next;
    * ListNode() : val(0), next(nullptr) {}
    * ListNode(int x) : val(x), next(nullptr) {}
    * ListNode(int x, ListNode *next) : val(x), next(next) {}
    * };
    */
    map<int, ListNode*> m;
    class Solution {

    public:
    ListNode* sortList(ListNode* head) {
    if (head == NULL)
    {
    return head;
    }
    ListNode* tail = head;
    while(tail->next!=NULL)
    {
    tail = tail->next;
    }
    return split(head, tail);
    }

    ListNode* split(ListNode* h, ListNode* tail)
    {
    if(h == NULL)
    {
    return NULL;
    }
    else if(h->next == NULL)
    {
    return h;
    }
    else if(h->next == tail)
    {
    h->next = NULL;
    return merge(h, tail);
    }
    ListNode* slow = h, *fast = h;
    while(fast!=tail)
    {
    slow = slow->next;
    fast = fast->next;
    if(fast!=tail)
    {
    fast = fast->next;
    }
    }
    ListNode* h2 = slow->next;
    slow->next = NULL;

    return merge(split(h, slow), split(h2, tail));
    }

    ListNode* merge(ListNode* h1, ListNode* h2)
    {
    if(h1 == NULL || h2 == NULL)
    {
    return h1?h1:h2;
    }
    ListNode* vHead = new ListNode();
    ListNode* ret = vHead;
    while(h1!=NULL&&h2!=NULL)
    {
    if(h1->val<h2->val)
    {
    vHead -> next = h1;
    h1 = h1->next;

    }
    else
    {
    vHead -> next = h2;
    h2 = h2->next;

    }

    vHead = vHead->next;
    }
    if(h1!=NULL)
    {
    vHead->next = h1;
    }
    else if(h2!=NULL)
    {
    vHead->next = h2;
    }
    return ret->next;
    }

    };

    链表归并排序的内存生命周期问题

  • 链表排序的时候假如不食用一个外部的头节点的话,会可能遇到报错
  • picture 0
    • 提示一个指针指向NULL,不可被操作了
    • 在整个过程中最好手动创建一个节点的next指向头节点,使得系统指向链表的指针不丢失,防止空间被回收
    • 比如如下多个链表合并的问题
      /**
      * Definition for singly-linked list.
      * struct ListNode {
      * int val;
      * ListNode *next;
      * ListNode() : val(0), next(nullptr) {}
      * ListNode(int x) : val(x), next(nullptr) {}
      * ListNode(int x, ListNode *next) : val(x), next(next) {}
      * };
      */
      #include <queue>

      class Solution {
      public:
      ListNode* mergeKLists(vector<ListNode*>& lists) {
      auto cmp = [](ListNode*& a, ListNode*& b){return a->val>b->val;};
      priority_queue<ListNode*, vector<ListNode*>, decltype(cmp)> pq(cmp);
      for(auto it = lists.begin(); it!=lists.end(); it++)
      {
      ListNode* cur = *it;
      while(cur!=NULL)
      {
      pq.push(cur);
      // cout<<cur->val<<' ';
      cur = cur->next;
      }
      }

      ListNode* head = pq.top();
      // cout<<head->val;
      ListNode* ret = head;
      pq.pop();
      while(pq.size()>0)
      {

      head->next = pq.top();
      // cout<<head->next->val;
      pq.pop();
      head = head->next;
      }

      head->next = NULL;
      // cout<<'!'<<endl;
      ListNode* tmp = ret;
      while(tmp!=NULL)
      {
      cout<<tmp->val<<endl;
      tmp = tmp->next;
      }
      return ret;
      }
      };
  • 但是实际上归并多个有序数组的时候只需要在一开始遍历每个数组的第一个元素,将其添加到优先级队列中,等到合并的时候从优先级队列中弹出某个元素的时候,再将其后继的数字添加到队列中即可不需要在一开始就把所有的节点都加入优先级队列

    快速排序 2023-10-30更新

  • 递归版本(leetcode)
    class Solution {
    public:
    vector<int> sortArray(vector<int>& nums) {
    fastSort(nums, 0, nums.size()-1);
    return nums;
    }
    void fastSort(vector<int>& arr, int beg ,int end)
    {
    if(end<=beg)return;
    int randPos = rand()%(end-beg)+beg;
    swap(arr[end], arr[randPos]);
    int less = beg-1; // 小于区的右边界,包括自己
    int more = end; //大于区的左边界,包括自己
    int index = beg; // 当前位置,左边一个是等于区
    while(index<more)
    {
    if(arr[index]<arr[end])
    {
    swap(arr[index++], arr[++less]); // 小于区加一
    }
    else if(arr[index] == arr[end])
    {
    index++; // 等于区加一
    }
    else
    {
    swap(arr[index], arr[--more]); // 大于区减一
    }
    }
    swap(arr[end], arr[more]);
    fastSort(arr, beg, less);
    fastSort(arr, more+1, end);
    }
    void swap(int& a, int& b)
    {
    int tmp = a;
    a = b;
    b = tmp;
    }
    };
  • 时间复杂度O(Nlog(N)),空间复杂度O(log(N)),
  • 荷兰国旗问题:将整个数组分为三个部分,左边的部分比给定的flag小,中间的部分等于flag,右边的部分大于flag。(选择最右为分割标志)
    • 其中的less是小于区的右边界(包括自己),more是大于区的左边界(包括自己)
    • index位置是等于区的右边一个位置(不包括自己),less右边一个到index-1的值(包括边界)与分割值相等
    • 假如index位置的数字和分割标志相等,直接index++
    • 假如index位置的数字比标志小,那么index位置的数字与小于区的左边界右边第一个数字交换,index和小于区的右边界各自++,相当于小于区推动等于区右移
    • 假如index位置的数字比标志大,那么将index位置的数字与大于区左边界的第一个数字交换,index不动,大于区的左边界左移一个位置。
    • 遍历结束之后,将数组最右边位置的数字与大于区左边界位置的数字进行交换(因为开始时候取的标志是最右的数字)
    • 下一层调用的时候,对小于区(开始位置到less)和大于区(more+1到结束位置)分别调用快排即可,因为前面已经将end位置和more位置交换过了,因此不需要从more位置开始,从more的下一个位置开始即可

      堆排序 2023-10-30更新

  • leetcode
    #include <iostream>
    #include <cstdlib>
    #include <vector>
    using namespace std;
    class Solution {
    public:
    vector<int> sortArray(vector<int>& nums) {
    // 从后向前逐个元素向下运动,建造大根堆
    for(int i = nums.size()-1; i>=0; i--)
    {
    heapDown(nums, i, nums.size());
    }

    for(int i = nums.size()-1; i>0; i--)
    {
    swap(nums, 0, i);
    heapDown(nums, 0, i);
    }

    return nums;

    }

    // 向下
    void heapDown(vector<int>& arr, int index, int size)
    {
    int big;
    while(index*2+1<size)
    {
    if(index*2+2>=size)
    {
    big = index*2+1;
    }
    else
    {
    big = arr[index*2+1] > arr[index*2+2]?index*2+1:index*2+2;
    }

    if(arr[index]<arr[big])
    {
    swap(arr, index, big);
    index = big;
    }
    else
    {
    break;
    }
    }
    }

    // 向上
    void heapUp(vector<int>& arr, int index)
    {
    while(index>=0)
    {
    if(((index-1)/2)>0)
    {
    if(arr[(index-1)/2]>arr[index])
    {
    swap(arr, (index-1)/2, index);
    }
    else
    {
    break;
    }
    }
    index = (index-1)/2;
    }
    }

    void swap(vector<int>& arr, int a, int b)
    {
    int temp = arr[a];
    arr[a] = arr[b];
    arr[b] = temp;
    }
    };
  • 时间复杂度O(Nlog(N)),空间复杂度O(1),不稳定
  • heapInsert是堆插入函数,将插入的数字向上看是否在需要的位置上
  • heapify是将数组中某个位置的数字向下移动,直到需要的位置(向下交换的时候与两个孩子中较大的那个交换)
  • 建堆的操作是从倒数第二个元素开始直到数组的第一个元素,执行向下调整函数
  • 建立堆之后实际上是将堆中的元素挨个取出的过程,就是每次从堆头取出一个元素,然后将堆尾部的元素与这个元素位置交换,将堆尾部的元素向下插入堆
  • 因为取出的元素是从后往前排列的,因此最终的结果是递增的,虽然前面元素向下的操作是大根堆

建立堆

public static class MyMaxHeap {
private int[] heap;
private final int limit;
private int heapSize;

public MyMaxHeap(int limit) {
heap = new int[limit];
this.limit = limit;
heapSize = 0;
}

public boolean isEmpty() {
return heapSize == 0;
}

public boolean isFull() {
return heapSize == limit;
}

public void push(int value) {
if (heapSize == limit) {
throw new RuntimeException("heap is full");
}
heap[heapSize] = value;
// value heapSize
heapInsert(heap, heapSize++);
}

// 用户此时,让你返回最大值,并且在大根堆中,把最大值删掉
// 剩下的数,依然保持大根堆组织
public int pop() {
int ans = heap[0];
swap(heap, 0, --heapSize);
heapify(heap, 0, heapSize);
return ans;
}

// 新加进来的数,现在停在了index位置,请依次往上移动,
// 移动到0位置,或者干不掉自己的父亲了,停!
private void heapInsert(int[] arr, int index) {
// [index] [index-1]/2
// index == 0
while (arr[index] > arr[(index - 1) / 2]) {
swap(arr, index, (index - 1) / 2);
index = (index - 1) / 2;
}
}

// 从index位置,往下看,不断的下沉
// 停:较大的孩子都不再比index位置的数大;已经没孩子了
private void heapify(int[] arr, int index, int heapSize) {
int left = index * 2 + 1;
while (left < heapSize) { // 如果有左孩子,有没有右孩子,可能有可能没有!
// 把较大孩子的下标,给largest
int largest = left + 1 < heapSize && arr[left + 1] > arr[left] ? left + 1 : left;
largest = arr[largest] > arr[index] ? largest : index;
if (largest == index) {
break;
}
// index和较大孩子,要互换
swap(arr, largest, index);
index = largest;
left = index * 2 + 1;
}
}

private void swap(int[] arr, int i, int j) {
int tmp = arr[i];
arr[i] = arr[j];
arr[j] = tmp;
}

}
  • 向堆插入数字的方法就是将堆的尺寸+1,然后从被插入数字开始上溯直到不比父亲大
  • 用户从堆顶弹出的方法是弹出之后将堆尺寸-1,然后将堆最后一个元素复制到以前堆顶的位置,然后执行heapify,也就是将该元素下沉直到不比儿子小为止

一维Cubic插值代码

#include <chrono>
#include <iostream>
#include <cstring>
#include <math.h>
double cubicCalc(double xs[4], double ys[4], double xInput)
{
// 旧方法
// return p[1] + 0.5 * x*(p[2] - p[0] + x * (2.0*p[0] - 5.0*p[1] + 4.0*p[2] - p[3] + x * (3.0*(p[1] - p[2]) + p[3] - p[0])));

// 初始化
double* H,*A,*B,*C,*D,*Z,*F,*X,*Y;
double dbOutY;
X = new double[4];
Y = new double[4];

A = new double[4];
B = new double[4];
C = new double[4];
D = new double[4];
H = new double[4];
memcpy(X, xs, 4*sizeof(double));
memcpy(Y, ys, 4*sizeof(double));

int M = 4;
int N = 3;
int i,P,L;
// 生成Spline
for (i=1;i<=N;i++)
{
H[i-1]=X[i]-X[i-1];
}

L=N-1;
for(i=1;i<=L;i++)
{
A[i]=H[i-1]/(H[i-1]+H[i]);
B[i]=3*((1-A[i])*(Y[i]-Y[i-1])/H[i-1]+A[i]*(Y[i+1]-Y[i])/H[i]);
}
A[0]=1;
A[N]=0;
B[0]=3*(Y[1]-Y[0])/H[0];
B[N]=3*(Y[N]-Y[N-1])/H[N-1];

for(i=0;i<=N;i++)
{
D[i]=2;
}

for(i=0;i<=N;i++)
{
C[i]=1-A[i];
}

P=N;
for(i=1;i<=P;i++)
{

if ( fabs(D[i]) <= 0.000001 )
{
return false;
// MessageBox(0,"�޽�","��ʾ,MB_OK);
//break;
}
A[i-1]=A[i-1]/D[i-1];
B[i-1]=B[i-1]/D[i-1];
D[i]=A[i-1]*(-C[i])+D[i];
B[i]=-C[i]*B[i-1]+B[i];
}
B[P]=B[P]/D[P];
for(i=1;i<=P;i++)
{
B[P-i]=B[P-i]-A[P-i]*B[P-i+1];
}
// 生成Spline结束
// 获得Y坐标
double E,E1,K,K1,H1;
int j ;
if(xInput<X[0])
{
j = 0;

}
else if (xInput > X[N])
{
j = N-1;
}
else
{
for (j=1;j<=N;j++)
{
if(xInput<=X[j])
{
j=j-1;

break;
}
}

}

//////////////////////////////////////////////////////////////////////////
E=X[j+1]-xInput;
E1=E*E;
K=xInput-X[j];
K1=K*K;
H1=H[j]*H[j];

dbOutY=(3*E1-2*E1*E/H[j])*Y[j]+(3*K1-2*K1*K/H[j])*Y[j+1];
dbOutY=dbOutY+(H[j]*E1-E1*E)*B[j]-(H[j]*K1-K1*K)*B[j+1];
dbOutY=dbOutY/H1;
return dbOutY;
}

二维插值

double bicubicInterpolate(double* xs, double* ys, double p[4][4], double x, double y)
{
double arr[4];
arr[0] = cubicCalc(xs, p[0], y);
arr[1] = cubicCalc(xs, p[1], y);
arr[2] = cubicCalc(xs, p[2], y);
arr[3] = cubicCalc(xs, p[3], y);
return cubicCalc(ys, arr, x);
}
  • 上述代码中的xs是描述二维矩阵中取样点的X坐标的集合(从小到大)
  • ys是上述矩阵中取样点的y坐标的集合
  • 二位插值的思路实际上就是先在一维上完成插值然后利用一维插值的结果向量再进行正交方向上的一维插值

  • 不要将二级指针和二维数组混为一谈,二维数组再指针作为起始地址的基础上必须还知道第二维度的长度才可以,因为实际上的数组索引操作是i*<第二维度大小> + j

    动态二维数组的创建和销毁(不使用Vector)

  • 创建
    double **dataMat;
    dataMat = new double* [x_size];
    for(int i = 0;i<xSize;i++)
    {
    dataMat[i] = new double[ySize];
    }
  • 参考链接
  • 释放二维数组
    for(int i = 0;i<数组第一维的数量>;i++)
    {
    delete dataMat[i];
    }
    delete dataMat;
  • 先逐个释放数组的行,然后再释放整个数组

    动态二维数组的传参

  • 对于正常创建的二维数组(不是使用上文的方法创建的动态数组)
    //方法1:传递数组,注意第二维必须标明
    void fun1(int arr[][3],int iRows)
    {
    for(int i=0;i<iRows;i++)
    {
    for(int j=0;j<3;j++)
    {
    cout<<arr[i][j]<<" ";
    }
    cout<<endl;
    }
    cout<<endl;
    }
    // 当作指针数组传递
    void fun2(int (*arr)[3],int iRows)
    {

    for(int i=0;i<iRows;i++)
    {
    for(int j=0;j<3;j++)
    {
    cout<<arr[i][j]<<" ";
    }
    cout<<endl;
    }
    cout<<endl;
    }
    // 直接传递一级指针(强制类型转换)
    void fun3(int*arr,int iRows,int iCols)
    {
    for(int i=0;i<iRows;i++)
    {
    for(int j=0;j<3;j++)
    {
    cout<<*(arr+i*iRows+j)<<" ";
    }
    cout<<endl;
    }
    cout<<endl;
    }
    int main()
    {
    int a[2][3]={{1,2,3},{4,5,6}};
    fun1(a,2);
    cout<<endl;
    fun2(a,2);
    cout<<endl;
    //此处必须进行强制类型转换,因为a是二维数组,而需要传入的是指针
    //所以必须强制转换成指针,如果a是一维数组则不必进行强制类型转换
    //为什么一维数组不用强制转换而二维数组必须转换,此问题还没解决,期待大牛!
    fun3((int*)a,2,3);
    cout<<endl;
    }


  • 假如预先不知道数组的第二维度是多少的话,还是只能使用强制类型转换为一级指针的方法传递。
  • 参考链接

WSL内核更换为自定义版本(解决微软安装的内核版本源码找不到的问题)

  • 编译自定义内核参考连接
  • 替换自定义内核参考
  • 效果
    • 图 1
    • 注意,config-wsl文件中的CONFIG_LOCALVERSION="-microsoft-wsl"可以修改

      模块的安装和卸载

  • 安装:sudo insmod <模块文件名>
  • 卸载:rmmod <模块文件名>
  • 查看模块信息 modinfo <模块文件名>
  • 参考链接
  • 打开系统日志可见效果;
  • 图 2

    在/proc下创建文件并且通过读写该文件实现与内核的交互

  • 参考链接
  • 参考链接
  • 参考连接
  • 上述参考链接由一些错误之处,比如需要include #include <linux/uaccess.h>
    • proc_ops的结构体ing不是file_operations,而是自己的结构
      struct proc_ops procOps = 
      {
      .proc_open = demo_open,
      .proc_write = demo_set,
      // .read = seq_read,

      };
  • create_proc_entry函数往往找不到需要替换成proc_create函数
  • single_open实际上是simple_open等等
  • 需要自己通过查看相应的头文件进行修正

    添加内核服务器并连接

  • 参考链接
  • 参考链接
  • 基本方法与创建Socket类似,用户需要自己定义一个内核端口号用于跟用户程序通信,用户程序只要跟相同端口号通信即可。

内核线程的创建

  • 参考链接
  • 主要是
    struct task_struct *kthread_create(int (*threadfn)(void *data),
    void *data,
    const char namefmt[], ...);
  • int wake_up_process(struct task_struct *tsk);
  • 两个函数
  • 因为使用kthread_create创建线程之后并不会立即开始执行,需要通过wake_up_process函数使其开始执行才可以。

内核互斥锁等

  • 参考链接
    #include <linux/mutex.h>
  • 加锁
    void mutex_lock(struct mutex *lock);
  • 解锁
    void mutex_unlock(struct mutex *lock);

    内核动态内存分配

  • 参考链接
    static __always_inline void *kmalloc(size_t size, gfp_t flags)

    内核延时

  • 参考链接

源码地址

C语言实现BP神经网络的推理以及反向传播

代码

  • 头文件
    #ifndef BPNETWORK_H
    #define BPNETWORK_H
    //所需头文件
    #include<math.h>
    #include<stdio.h>
    #include<stdlib.h>
    #include<string.h>


    #define f(x) Sigmoid(x)//激活函数设定
    #define f_(x) Sigmoidf(x)//导函数

    typedef struct {
    double* ws;//权重矩阵
    double* bs;//偏置数组
    double* os;//输出数组
    double* ss;//误差(总误差关于加权和的偏导)
    } Layer;
    typedef struct {
    int lns;//层数
    int* ns;//每层神经元的数量
    double* is;//神经网络输入
    double* ts;//理想输出
    Layer* las;//神经网络各个层(不包括输入层)
    double ln;//学习率
    }BPNetWork;


    //创建神经网络
    BPNetWork* BPCreate(int* nums, int len,double ln);
    //运行一次神经网络
    void RunOnce(BPNetWork* network);
    //载入训练集
    void LoadIn(BPNetWork* network, double* input, double* putout);
    //反向传播一次(训练一次)
    void TrainOnce(BPNetWork* network);
    //输出总误差
    double ETotal(BPNetWork* network);

    //sigmoid激活函数
    #define Sigmoid(x) (1 / (1 + exp(-(x))))
    //sigmoid激活函数的导函数(用反函数的形式表示),输入为sigmoid输出
    #define Sigmoidf(f) ((f) * (1 - (f)))
    #define Tanh(x) ((2 / (1 + exp(-2 * (x))))-1)
    #define Tanhf(f) ((1+(f))*(1-(f)))
    #endif
  • .c文件
    #include"BPNetWork.h"


    //神经网络的层数
    #define LS network->lns

    //输入层神经元的数量
    #define INNS network->ns[0]

    //输入层的第a个输入
    #define INS(a) network->is[a-1]

    //第a个理想输出
    #define TAS(a) network->ts[a-1]

    //输出层神经元的数量
    #define OUTNS network->ns[LS-1]

    //第n层神经元的数量
    #define NS(n) network->ns[n-1]

    //第n层第a个神经元的第p个权重
    #define WF(n,a,p) network->las[n-2].ws[(p-1)+(a-1)*NS(n-1)]

    //第n层的第a个神经元的偏置
    #define BF(n,a) network->las[n-2].bs[a-1]

    //第n层第a个神经元的输出
    #define OF(n,a) network->las[n-2].os[a-1]

    //第n层第a个神经元的误差
    #define SF(n,a) network->las[n-2].ss[a-1]

    //学习率
    #define LN network->ln

    BPNetWork* BPCreate(int* nums, int len,double ln)
    {
    BPNetWork* network = malloc(sizeof(BPNetWork));
    network->lns = len;
    network->ns = malloc(len * sizeof(int));
    network->ln = ln;
    memcpy(network->ns, nums, len * sizeof(int)); // nums传入的是每层的神经元数目,将其拷贝到储存每层神经元数量的ns
    //
    network->is = malloc(nums[0] * sizeof(double)); // 神经网络输入
    network->las = malloc(sizeof(Layer) * (len - 1)); // 神经网络各个层
    network->ts = malloc(sizeof(double) * nums[len - 1]); // 神经网络理想输出
    srand(&network);//用networkd的内存地址做为随机数种子
    for (int p = 0; p < len - 1; p++) {
    int lastnum = nums[p];//上一层的神经元数量
    int num = nums[p + 1];//当前层的神经元数量(从第二层开始)
    network->las[p].bs = malloc(sizeof(double) * num); //偏置数组
    //
    network->las[p].ws = malloc(sizeof(double) * num * lastnum); //权重矩阵(大小是本层与上一层的节点数量的乘积)
    //
    network->las[p].os = malloc(sizeof(double) * num); //输出数组
    //
    network->las[p].ss = malloc(sizeof(double) * num); //误差
    for (int pp = 0; pp < num; pp++) {
    //这里rand()/2.0的意思是把整数除整数转换为浮点数除整数
    //如果是整数除整数,输出则为带余的商
    network->las[p].bs[pp] = rand() / 2.0 / RAND_MAX; //偏置矩阵初始化随机数
    for (int ppp = 0; ppp < lastnum; ppp++) {
    network->las[p].ws[ppp + pp * lastnum] = rand() / 2.0 / RAND_MAX; //权重矩阵初始化随机数
    }
    }
    }
    return network;
    }

    void RunOnce(BPNetWork* network) {
    //计算输入层到第二层
    for (int a = 1; a <= NS(2); a++) {
    double net = 0;
    double* o = &OF(2,a);// 第2层的输出值指针
    for (int aa = 1; aa <= INNS; aa++) {
    // 和是向量积
    net += INS(aa) * WF(2, a, aa);//输入层的某个输入*第一个全连接层中相应的权重*第一个全连接层的神经元数值
    }
    *o = f(net + BF(2,a)); //加偏置计算最终结果,然后乘激活函数,写入第二层的输出数组中
    }
    for (int n = 2; n <= LS-1; n++) { //LS是层数
    for (int a = 1; a <= NS(n + 1); a++) {//NS是对应层神经元的数量,循环内容是针对下一层的每个神经元
    double net = 0;
    double* o = &OF(n+1,a);
    for (int aa = 1; aa <= NS(n); aa++) { // 计算向量积
    double oo = OF(n, aa); // 上一层某个神经元的输出
    double* ww = &WF(n + 1, a, aa); // 第a个和第aa个的权重
    net += oo * (*ww); // 和是向量积
    }
    *o = f(net + BF(n + 1, a));
    }
    }
    }

    void TrainOnce(BPNetWork* network) {
    //计算输出层的误差函数
    for (int a = 1; a <= OUTNS; a++) {
    double* s = &SF(LS,a);//获取第a个神经元的误差
    double* b = &BF(LS, a);//获取第a个神经元的偏置
    double o = OF(LS, a);//获取第a个神经元的输出
    *s = (2.0 / OUTNS) * (o - TAS(a))* f_(o); // 2/输出层元素数量*(某个神经元的输出-该位置的理想输出)* 斜率
    *b = *b - LN * (*s); //更新偏置
    //更新权重
    for (int aa = 1; aa <=NS(LS-1) ; aa++) {
    double* w = &WF(LS, a, aa); // 获得最后一层权重矩阵的权重
    *w = *w - LN * (*s) * OF(LS-1, aa); // 权重减去 学习率*上面计算出的s*上一层该神经元的输出
    }
    }

    //计算隐藏层的误差
    for (int a = LS-1; a > 2; a--) {
    //开始计算第a层每个神经元的误差
    for (int n = 1; n <= NS(a); n++) {//当前层
    double* s = &SF(a, n);//获取第a个神经元的误差
    *s = 0;
    double* b = &BF(a, n);//获取第a个神经元的偏置
    double o = OF(a, n);//获取第a个神经元的输出
    for (int nn = 1; nn <= NS(a+1); nn++) {//下一层
    double lw = WF(a + 1, nn, n);//获取下一层到当前神经元的权重
    double ls = SF(a + 1, nn);//获取下一层第nn个神经元的误差
    *s += ls * lw * f_(o); // 权重*误差*激活函数斜率,和是向量积
    }
    *b = *b - LN * (*s);//更新偏置
    //更新权重
    for (int nn = 1; nn <= NS(a - 1); nn++) {//上一层
    double* w = &WF(a, n, nn); // 更新上一层到这一层的权重矩阵
    *w = *w - LN * (*s) *OF(a - 1, nn);
    }
    }
    }

    //计算第2层的误差函数(输入层到第一隐藏层)
    for (int n = 1; n <= NS(2); n++) {//当前层
    double* s = &SF(2, n);//获取第a个神经元的误差
    *s = 0;
    double* b = &BF(2, n);//获取第a个神经元的偏置
    double o = OF(2, n);//获取第a个神经元的输出
    for (int nn = 1; nn <= NS(3); nn++) {//下一层
    double lw = WF(3, nn, n);//获取下一层到当前神经元的权重
    double ls = SF(3, nn);//获取下一层第nn个神经元的误差
    *s += ls * lw * f_(o);
    }
    *b = *b - LN * (*s);//更新偏置
    //更新权重
    for (int nn = 1; nn <= INNS; nn++) {//上一层
    double* w = &WF(2, n, nn);
    *w = *w - LN * (*s) * INS(nn);
    }
    }

    }

    void LoadIn(BPNetWork* network,double* input,double* putout) {
    memcpy(network->is, input, INNS*sizeof(double));
    memcpy(network->ts, putout, OUTNS*sizeof(double));
    }

    int main() {
    int a[] = { 1,20,20,1 };//4层神经元,数量分别为1,20,20,1
    double in[1] = { 0.9 };//训练样本输入1
    double in1[1] = { 0.1 };//训练样本输入2
    double in2[1] = { 0.5 };//训练样本输入3
    double out[1] = { 0.1 };//理想输出
    //神经网络训练目标:
    //输入任意值,输出0.1
    BPNetWork* network = BPCreate(a, 4, 0.5);
    int c = 1000;//训练1000次
    while (c--) {
    LoadIn(network, in, out);
    RunOnce(network);
    TrainOnce(network);
    LoadIn(network, in1, out);
    RunOnce(network);
    TrainOnce(network);
    LoadIn(network, in2, out);
    RunOnce(network);
    TrainOnce(network);
    }
    //训练完后来一波测试
    double t[1] = { 0.7 };//输入
    double o[1] = { 0.2 };//凑数
    LoadIn(network, t, o);
    RunOnce(network);
    printf("OK\n");
    printf("%g\n", ETotal(network));
    printf("%g", OF(4, 1));
    return 0;
    }

计算图

正向

  • 正向推理的计算过程是某层的某个节点的输出数值等于该层上一层的某个节点的输出×这个节点到该层待求的节点的权重, 如上对上一层每个节点计算一遍并求和,然后加上该层该节点的偏置,并且带入激活函数计算得到这层这个节点的输出
  • 图 1

    反向传播

  • 反向传播的计算对于输出层到上一层的权重更新而言就是上一层到这一层某节点的权重减去输出层某节点的实际输出和理想输出的差×激活函数的导数×系数×学习率×上一层对应节点的输出
  • 对于中间层的计算,某个节点的误差等于下一层某节点到该节点的权重×下一层对应节点的误差×该节点激活函数的斜率,如上计算求和得到该节点的误差,然后对于上一层每个节点到这一个节点的权重,更新方法为减去学习率×该节点的误差(前文计算的)×上一层对应节点的输出
  • 图 2

开发板配置nfs踩坑

配置好nfs服务器路径等之后重启nfs服务的时候可能无法重启遇到错误

  • 图 1
  • 此时需要执行命令sudo service rpcbind start
  • 然后再执行sudo /etc/init.d/nfs-kernel-server restart

    从Uboot启动Linux可能ping不通WSL的问题

  • 开发板Linux端使用命令ifconfig eth0 172.20.98.200 netmask 255.255.240.0,配置ip地址和子网掩码,配置到与WSL再同一个子网之下即可ping通

    Uboot可以通过tftp下载内核和设备树但是无法用nfs下载文件系统的问题

  • 使用WSL安装旧版(比如18.04)的Ubuntu
  • 将Ubuntu移动到D盘(假如C盘空间不足)参考链接
  • 安装好之后安装完nfs服务之后,将服务的配置文件/etc/default/nfs-kernel-server文件进行修改如下
      # Number of servers to start up
    RPCNFSDCOUNT="-V 2 8"

    # Runtime priority of server (see nice(1))
    RPCNFSDPRIORITY=0

    # Options for rpc.mountd.
    # If you have a port-based firewall, you might want to set up
    # a fixed port here using the --port option. For more information,
    # see rpc.mountd(8) or http://wiki.debian.org/SecuringNFS
    # To disable NFSv4 on the server, specify '--no-nfs-version 4' here
    RPCMOUNTDOPTS="-V 2 --manage-gids"

    # Do you want to start the svcgssd daemon? It is only required for Kerberos
    # exports. Valid alternatives are "yes" and "no"; the default is "no".
    NEED_SVCGSSD=""

    # Options for rpc.svcgssd.
    RPCSVCGSSDOPTS="--nfs-version 2,3,4 --debug --syslog"
    RPCNFSDOPTS="--nfs-version 2,3,4 --debug --syslog"
  • 然后重启WSL虚拟机,然后重启tftp、xinetd、rpcbind、nfs服务**
  • 注意重启之后WSL所处的网段、子网掩码、网关等都可能改变,,所以一定要使用WSL的
    ifconfig <网卡号(比如eth0)> <指定的IP地址>
    设置WSL系统的IP地址到同一个网段下,假如重启之后开发板ping不通虚拟机的话还需要重新按照之前的博客配置虚拟机网络与开发板的桥接
  • 成功结果如图
  • 图 2

配置开发板通过网线连接本机WSL虚拟机

  • 开发板先正常启动到Linux系统方便调试

  • 开发板用上面的网线接口连接到计算机的网口

  • 此时在计算机Windows端命令行输入ipconfig可以看到“以太网”具有相应的IP地址等信息

  • 打开WSL虚拟机

  • 在WSL虚拟机使用ifconfig命令查看虚拟机的网络配置,IP地址,子网掩码,广播地址等等

  • 图 1

  • 虚拟机使用netstat -rn命令查看网关

  • 图 2

  • 看到内核路由表的第一条的Gateway就是网关信息

  • 此时WSL处在NAT模式,没有开启桥接

  • 使用命令Get-NetAdapter查看网络设备

  • 使用命令Set-VMSwitch WSL -NetAdapterName <桥接到的网卡名称>桥接WSL与以太网,如下(直接输入中文“以太网”即可)

  • 图 3

  • 复位开发板,按下键盘打断Uboot启动Linux

  • 使用Uboot的如下命令设置网络并保存环境变量

    setenv ipaddr <与WSL虚拟机在同一子网下的另一个IP地址>
    setenv gatewayip <WSL虚拟机上看到的网关>
    setenv netmask <WSL虚拟机看到的子网掩码>
    setenv serverip <WSL虚拟机上ifconfig看到的IP地址>
    saveenv
  • 然后尝试ping WSL虚拟机IP(也就是在WSL中ifconfig看到的IP)

  • 图 4

  • 然后开始使用tftp传输Linux内核

  • 图 5

配置WSL2为桥接模式(原来是NAT模式)

  • 配置为桥接模式之后局域网中的设备就可以直接访问WSL,不需要借助电脑的端口转发

  • 首先在命令行(具有管理员权限)中输入Get-NetAdapter,查看电脑的网卡情况(此时可能看不到WSL的虚拟网卡)

  • 图 1

  • 然后使用命令Set-VMSwitch WSL -NetAdapterName <桥接到的网卡名称>,将其中的尖括号部分替换为需要桥接到的网卡,比如WLAN

    Set-VMSwitch WSL -NetAdapterName WLAN
  • 然后再次使用Get-NetAdapter,输出如下

  • 图 2

  • 可见增加了基于Hyper-V的WSL虚拟网卡

  • 然后使用Windows的ipconfig查询计算机的网关等信息,同时在设置中查看计算机的DNS等信息,然后使用这些信息配置WSL的网络

  • 图 4

  • 图 5

  • 使用如下命令配置WSL的网络(WSL中)

    sudo ip addr del $(ip addr show eth0 | grep 'inet\b' | awk '{print $2}' | head -n 1) dev eth0
    sudo ip addr add <需要设置的IP地址>/24 broadcast <局域网广播地址(一般是网络号.网络号.网络号.255)> dev eth0
    sudo ip route add 0.0.0.0/0 via <默认网关> dev eth0
  • 然后WSLping百度可以ping通

  • 图 6

  • WindowspingWSL的IP也可以ping

  • 图 7

  • 参考链接

  • 注意这样实际上是整个电脑通过WSL的网卡在上网,使用的就是主机的IP地址

    更改WSL为桥接模式之后远程显示的问题

  • 因为更改WSL为桥接模式之后,WSL变为局域网下与Windows平级的设备,所以需要重新配置.bashrc

    vim ~/.bashrc

    找到这一行

    export DISPLAY=<IP地址>:0
  • 将这一行中尖括号的部分修改为计算机在局域网中的IP地址然后即可继续使用WSL桌面(比如startxfce4

  • 图 8

    修改DNS服务器

    您可以通过以下步骤在WSL中设置DNS服务器:

  • 启动WSL,进入目录,创建wsl.conf文件。例如,您可以使用以下命令:

    cd ~/../../etc
    sudo vim wsl.conf
    sudo touch wsl.conf
  • 将这些行添加到wsl.conf中:

    [network]
    generateResolvConf=false
  • 退出WSL,关闭WSL。您可以使用以下命令:

    exit
    wsl --shutdown
  • 此时,由于有了wsl.conf,run/resolvconf应该不再存在,并且将不再被创建。

  • 删除现有的符号链接文件。例如,您可以使用以下命令:

    cd ~/../../etc
    sudo rm resolv.conf
  • 创建一个新的resolv.conf文件。例如,您可以使用以下命令:

    sudo vim resolv.conf
    sudo touch resolv.conf
  • 将自己的DNS添加到resolv.conf中。例如:

    nameserver 8.8.8.8
  • 其中8.8.8.8是您想要使用的DNS服务器地址。

  • 重启WSL。您可以使用以下命令:

    exit
    wsl --shutdown
  • 再次启动WSL

Linux下使用epoll的C语言服务端

  • 该服务器使用了epoll处理多个同时链接的客户端的事件。
  • 流程为开始使用epoll_create创建一个epoll的Fd,然后将以服务器socket为基础的事件使用epoll_ctl将其添加处理。
  • 然后整个程序进入无限循环,调用epoll_wait等待事件,然后获取到事件列表之后,使用for循环逐个处理,此处仅仅处理收取数据的事件,实际上常见的事件为EPOLLINEPOLLETEPOLLOUT,三者的详细介绍在此不详细解释。
    #include <stdio.h>
    #include <stdlib.h>
    #include <arpa/inet.h>
    #include <unistd.h>
    #include <string.h>
    #include <sys/types.h>
    #include <sys/socket.h>
    #include <netinet/in.h>
    #include <arpa/inet.h>
    #include <netdb.h>
    #include <net/if.h>
    #include <sys/ioctl.h>

    // #include <pthread.h>
    #include <signal.h>

    #include <sys/epoll.h>
    #include <unordered_map>

    // using namespace std;

    #define SERVERPORT 8080

    int sockfd;

    /*linux上支持(Android上也支持), 此函数不仅能获取IP,还可以获取MAC地址、掩码和广播地址等*/
    int get_local_ip_using_ifconf(char *str_ip)
    {
    int sock_fd, intrface;
    struct ifreq buf[INET_ADDRSTRLEN];
    struct ifconf ifc;
    char *local_ip = NULL;
    int status = -1;

    if ((sock_fd = socket(AF_INET, SOCK_DGRAM, 0)) >= 0)
    {
    ifc.ifc_len = sizeof(buf);
    ifc.ifc_buf = (caddr_t)buf;
    if (!ioctl(sock_fd, SIOCGIFCONF, (char *)&ifc))
    {
    intrface = ifc.ifc_len/sizeof(struct ifreq);
    while (intrface-- > 0)
    {
    if (!(ioctl(sock_fd, SIOCGIFADDR, (char *)&buf[intrface])))
    {
    local_ip = NULL;
    local_ip = inet_ntoa(((struct sockaddr_in*)(&buf[intrface].ifr_addr))->sin_addr);
    if(local_ip)
    {
    strcpy(str_ip, local_ip);
    status = 0;
    if(strcmp("127.0.0.1", str_ip))
    {
    break;
    }
    }

    }
    }
    }
    close(sock_fd);
    }
    return status;
    }

    typedef struct clientString
    {
    char* ipAdd;
    int port;
    } clientStruct;


    void SIGINTHandler(int sig)
    {
    close(sockfd);
    printf("\nServer stopping, already closed socket %d. \n", sockfd);
    exit(EXIT_SUCCESS);
    }

    int main()
    {
    struct sockaddr_in server_addr = {0};
    struct sockaddr_in client_addr = {0};
    char ip_str[20] = {0};

    int addrlen = sizeof(client_addr);
    int ret;
    char localIPBuf[20];

    signal(SIGINT, (sig_t)SIGINTHandler);

    /* 打开套接字,得到套接字描述符 */
    sockfd = socket(AF_INET, SOCK_STREAM, 0);
    if (0 > sockfd)
    {
    perror("socket error");
    exit(EXIT_FAILURE);
    }

    /* 将套接字与指定端口号进行绑定 */
    server_addr.sin_family = AF_INET;
    server_addr.sin_addr.s_addr = htonl(INADDR_ANY);
    server_addr.sin_port = htons(SERVERPORT);

    char buf[20];
    get_local_ip_using_ifconf(buf);
    puts(buf);


    inet_ntop(AF_INET, &(server_addr.sin_addr), localIPBuf, sizeof(localIPBuf));
    // puts(localIPBuf);

    ret = bind(sockfd, (struct sockaddr *)&server_addr, sizeof(server_addr));
    if (0 > ret)
    {
    perror("bind error");
    close(sockfd);
    exit(EXIT_FAILURE);
    }
    /* 使服务器进入监听状态 */
    ret = listen(sockfd, 50);
    if (0 > ret)
    {
    perror("listen error");
    close(sockfd);
    exit(EXIT_FAILURE);
    }
    /* 阻塞等待客户端连接 */
    int epfd, connfd;
    epfd = epoll_create(256);
    struct epoll_event ev, events[10];
    ev.data.fd = sockfd;
    ev.events = EPOLLIN|EPOLLET|EPOLLOUT;
    epoll_ctl(epfd, EPOLL_CTL_ADD, sockfd, &ev);
    int nOfEvent = 0;
    char *ipStr;
    int clientFd;
    int n;
    char line[256];
    std::unordered_map<int, clientStruct> m;
    while(1)
    {
    nOfEvent = epoll_wait(epfd, events, 10, -1);
    for(int i = 0;i<nOfEvent;++i)
    {
    if(events[i].data.fd == sockfd)
    {
    clientStruct clientTemp;
    connfd = accept(sockfd, (sockaddr* )&client_addr, (socklen_t*)&addrlen);
    if(connfd<0)
    {
    printf("Error: Accept Failure!\n");
    exit(1);
    }
    ipStr = inet_ntoa(client_addr.sin_addr);
    printf("client: %s\n", ipStr);
    //将客户端socket与客户端IP的映射关系存入map
    clientTemp.ipAdd = ipStr;
    clientTemp.port = ntohs(client_addr.sin_port);
    m.insert(std::pair<int, clientStruct>(connfd, clientTemp));
    ev.data.fd = connfd;
    ev.events = EPOLLIN|EPOLLET;
    //修改epoll
    epoll_ctl(epfd, EPOLL_CTL_ADD, connfd, &ev);
    }
    else if (events[i].events & EPOLLIN)
    {
    printf("EPOLLIN!\n");
    if((clientFd = events[i].data.fd)<0)continue;
    if((n = read(clientFd, line, 256))<=0)
    {
    close(clientFd);
    printf("Client Error!\n");
    //从映射关系中抹除之前断开的socket
    m.erase(connfd);
    }
    else
    {
    line[n-1] = '!';
    line[n] = 0;
    printf("Got message from: %s:", m.count(connfd)>0?m[connfd].ipAdd:"Unkown Client");
    printf("%4d\n", m.count(connfd)>0?m[connfd].port:0);
    printf("data length = %d\n", strlen(line));
    //回显
    write(clientFd, line, strlen(line)+1);
    memset(line, 0, sizeof(line));
    }

    ev.data.fd = clientFd;
    ev.events = EPOLLIN|EPOLLET;
    // epoll_ctl(epfd, EPOLL_CTL_MOD, clientFd, &ev);
    }
    /*
    else if(events[i].events&EPOLLOUT)
    {
    printf("Sent!");
    clientFd = events[i].data.fd;
    // write(clientFd, line, strlen(line));

    ev.data.fd = clientFd;
    ev.events = EPOLLOUT|EPOLLIN|EPOLLET;
    epoll_ctl(epfd, EPOLL_CTL_MOD, clientFd, &ev);
    }*/

    }
    }


    /* 关闭套接字 */
    close(sockfd);
    exit(EXIT_SUCCESS);
    }
  • 上述服务器提供了一个基于C++unordered_map实现的映射,将每次接收到的事件的fd映射到一个存储了该客户端socket对应的IP地址和端口号的结构体上,服务器将其读出即可获取此客户端的相关信息。映射关系是在该客户端初次连接到服务器的时候创建的,并且会在连接关闭或者出现异常的时候从映射中移除。
  • 下面为客户端
    #include <stdio.h>
    #include <sys/types.h>
    #include <sys/socket.h>
    #include <string.h>
    #include <netinet/in.h>
    #include <arpa/inet.h>
    #include <unistd.h>
    #include <stdlib.h>

    #define SERVER_PORT 8080
    #define SERVER_IP "0.0.0.0"
    int sockFd = 0;
    void SIGINTHandler(int sig)
    {
    close(sockFd);
    printf("\nClient stopping, already closed socket %d. \n", sockFd);
    exit(EXIT_SUCCESS);
    }

    int main()
    {

    int ret;
    struct sockaddr_in sock_server_addr;
    char sendBuf[100] = {'\0'};
    char readBuf[2] = {0};
    int send_len;

    sockFd = socket(AF_INET, SOCK_STREAM, 0);
    if(sockFd <0)
    {
    printf("Open socket Error!\n");
    exit(EXIT_FAILURE);
    }
    sock_server_addr.sin_family = AF_INET;
    sock_server_addr.sin_port = htons(SERVER_PORT);

    inet_aton(SERVER_IP, &sock_server_addr.sin_addr);
    memset(sock_server_addr.sin_zero, 0, 8);
    printf("Client started, trying to connect %s:%4d. \n", SERVER_IP, SERVER_PORT);
    ret = connect(sockFd, (struct sockaddr*)&sock_server_addr, sizeof(struct sockaddr));
    printf("Client Connected!\n");
    if(ret<0)
    {
    printf("connect Error!\n");
    exit(EXIT_FAILURE);
    }
    while(1)
    {
    scanf("%s", (char *)&sendBuf);
    write(sockFd, sendBuf, strlen(sendBuf)+1);
    int n = 0;
    n = read(sockFd, readBuf, 1);
    puts("Server Repeat: ");
    // printf(readBuf);
    while (readBuf[0]!=0&&n>0)
    {
    // puts(":");
    printf(readBuf);
    n = read(sockFd, readBuf, 1);
    }
    printf("\n");

    memset(sendBuf, sizeof(sendBuf), 0);
    memset(readBuf, sizeof(readBuf), 0);
    }
    }

使用VSCode结合hexo撰写博客

  • VSCode安装Markdown All in One插件
    图 5

  • 安装Markdown Image插件
    图 6

  • 安装之后配置该插件的设置部分

  • 图 7

  • 然后注意将图片目录配置为之前自己指定的hexo图片目录

  • 图 8

  • 然后在使用的时候使用VSCode打开文件夹打开hexo的source文件夹,然后即可自动加载图片进行预览

  • 图 9

  • 使用VSCode打开文件夹之后就不需要手动配置Makrdown all in one的根目录