官方文档
- cython
用法
- 参考(详细)
- 定义一个
.pyx文件# try111.pyx
import time
def say_hello_to_c(m):
t1 = time.time()
sum = 0
for i in range(m):
sum+=i
t2 = time.time()
# print(t2-t1)
return t2-t1 - 创建
setup.py# setup.py
from setuptools import setup
from Cython.Build import cythonize
setup(
name='Hello world app',
ext_modules=cythonize("try111.pyx"),
) - 使用cython编译文件为一个
.so模块 python3 setup.py build_ext --inplace- 直接调用
from try111 import say_hello_to_c
import matplotlib.pyplot as plt
import time
from tqdm import tqdm
import math
def say_hello_to_py(m):
    t1 = time.time()
    sum = 0
    for i in range(m):
        sum+=i
    t2 = time.time()
    # print(t2-t1)
    return t2-t1

t1s = []
t2s = []
for i in tqdm(range(100)):
    t1s.append(say_hello_to_c(10000000))
    t2s.append(say_hello_to_py(10000000))

plt.plot(t1s, label="cython")
plt.plot(t2s, label="python")
plt.legend()
plt.ylabel("time elapsed: s")
plt.xlabel("count of try")
avg1 = sum(t1s)/len(t1s)
avg2 = sum(t2s)/len(t2s)
plt.title("Cython average time: %03f, pythonaverage time: %03f"% (avg1, avg2))
plt.show() 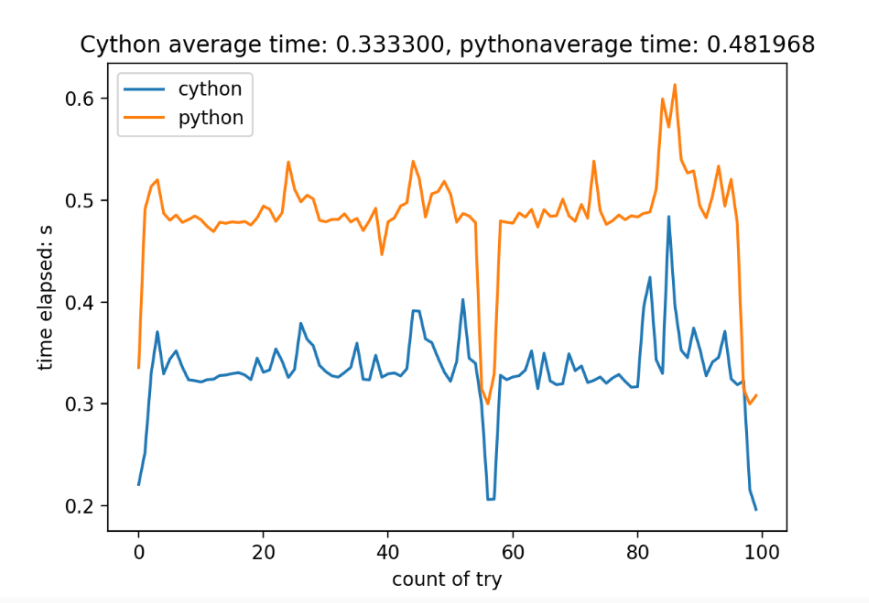
- 使用
cythonize直接编译 - 使用方法
options:
  -h, --help            show this help message and exit
  -X NAME=VALUE,..., --directive NAME=VALUE,...
                        set a compiler directive
  -E NAME=VALUE,..., --compile-time-env NAME=VALUE,...
                        set a compile time environment variable
  -s NAME=VALUE, --option NAME=VALUE
                        set a cythonize option
  -2                    use Python 2 syntax mode by default
  -3                    use Python 3 syntax mode by default
  --3str                use Python 3 syntax mode by default
  -+, --cplus           Compile as C++ rather than C
  -a, --annotate        Produce a colorized HTML version of the source.
  --annotate-fullc      Produce a colorized HTML version of the source which includes entire generated C/C++-code.
  -x PATTERN, --exclude PATTERN
                        exclude certain file patterns from the compilation
  -b, --build           build extension modules using distutils/setuptools
  -i, --inplace         build extension modules in place using distutils/setuptools (implies -b)
  -j N, --parallel N    run builds in N parallel jobs (default: 18)
  -f, --force           force recompilation
  -q, --quiet           be less verbose during compilation
  --lenient             increase Python compatibility by ignoring some compile time errors
  -k, --keep-going      compile as much as possible, ignore compilation failures
  --no-docstrings       strip docstrings
-M, --depfile produce depfiles for the sources - 编译C++文件的时候需要加上
--cplus - 比如
cythonize -i <pyx文件名> -j <并行的线程数量># tryCpp.pyx
# distutils: language = c++
from libcpp.vector cimport vector
from libcpp.map cimport map
from libcpp.string cimport string
def vectorCalc(int num):
cdef int cnt, i, j
cdef vector[int] p
cdef map
p.reserve(num)
for i in range(num*5):
p.push_back(i)
for j in range(num*5):
p.pop_back()
def useMap(int cnt):
cdef int i, j
cdef map[int, string] testMap
for i in range(cnt):
testMap[i] = <string>(b"This is %d" % i)
return testMap
# 以下是另一种方法
def useMap(int cnt):
cdef int i, j
cdef map[int, string] testMap
cdef pair[int, string] p
for i in range(cnt):
# testMap[i] = <string>(b"This is %d" % i)
p = (i, <string>(b"This is %d" % i))
testMap.insert(p)
return testMap # distutils: language = c++的意思是告诉cython这个文件需要做成Cpp文件- 从上述代码可以看出,可以在cython中使用cpp标准库中的文件
在cython中使用C++中编写的类
- 教程
- 编写头文件和Cpp文件
//tryCLass.h
namespace try111
{
class tryClass
{
int i, j;
public:
tryClass(int m, int n);
tryClass();
~tryClass();
};
};
//tryCLass.cpp
try111::tryClass::tryClass(int m, int n):i(m),j(n)
{
std::cout<<"try Class created, i:"<<i<<"j:"<<j<<std::endl;
}
try111::tryClass::tryClass():i(1),j(1)
{
std::cout<<"try Class created"<<std::endl;
}
try111::tryClass::~tryClass()
{
std::cout<<"try Class destroyed, i:"<<i<<"j:"<<j<<std::endl;
} - 在
.pxd文件中声明这个文件# tryClass.pxd
cdef extern from "tryClass.cpp":
pass
cdef extern from "tryClass.h" namespace "try111":
cdef cppclass tryClass:
tryClass(int i, int j) except +
tryClass() except + - 在
.pyx文件中引用这个文件中的类 .pyx的第一行要添加# distutils: language = c++# tryImp.pyx
# distutils: language = c++
from tryCLass cimport tryClass
def tryObj():
heapObj = new tryClass(99, 98)
cdef tryClass ttt = tryClass(97, 96)
del heapObj- 编译
cythonize -i -f tryImp.pyx -j8 - 在python文件中调用
.pyx文件中的函数# main.py
from tryImp import *
tryObj()cython中使用C++开发的函数
- 类似的,直接在cpp文件中定义一个函数
// func.cpp
void func(int cnt)
{
std::cout<<"func:";
for(int i = 0; i<cnt; i++)
{
std::cout<<i<<std::endl;
}
} - 使用
.pxd文件包装# impFunc.pxd
cdef extern from "func.cpp":
void func(int cnt) - 在
.pyx中调用#useFunc.pyx
# distutils: language = c++
from impFunc cimport func
def useFunc(int i):
func(i) - 编译
cythonize -i -f useFunc.pyx -j8 - 在python文件中使用
from useFunc import useFunc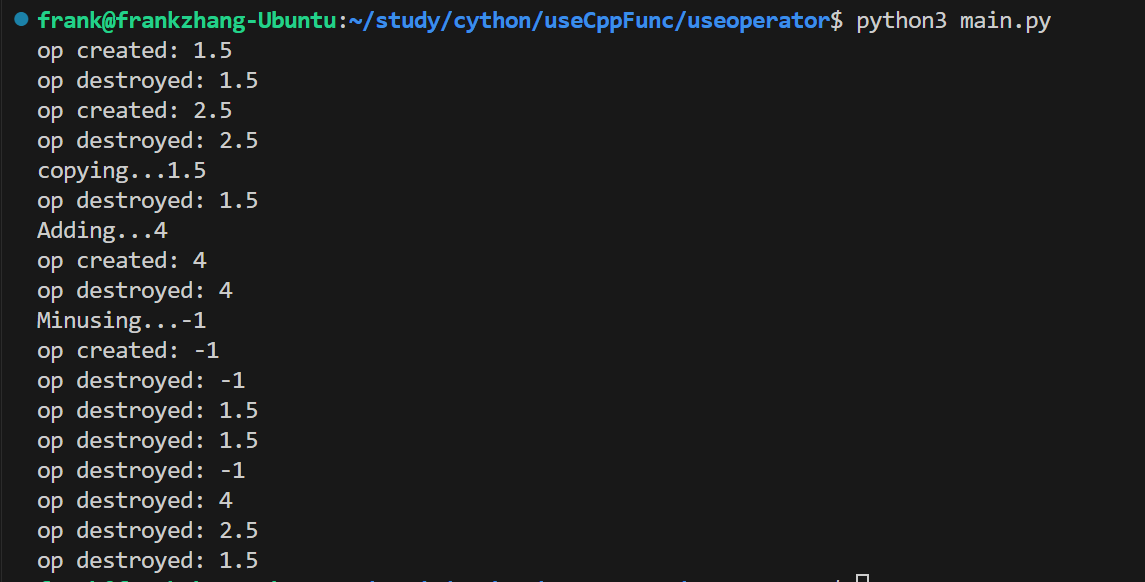
useFunc(5) - 执行结果
- 参考
- 使用重载运算符和类模板
// opReload.h
namespace OPRELOAD
{
template <typename T>
class opReload
{
private:
T inner;
/* data */
public:
opReload();
opReload(const T& arg);
opReload(const opReload<T>& o);
opReload operator+(const opReload<T>& o1);
opReload operator-(const opReload<T>& o1);
T getInner();
~opReload();
};
template <typename T>
T opReload<T>::getInner()
{
return this->inner;
}
template <typename T>
opReload<T>::opReload()
{
}
template <typename T>
opReload<T> ::opReload(const opReload<T>& arg)
{
this->inner = arg.inner;
std::cout<<"copying..."<<arg.inner<<std::endl;
}
template <typename T>
opReload<T>::opReload(const T& arg)
{
std::cout<<"op created: "<<arg<<std::endl;
inner = arg;
}
template <typename T>
opReload<T>::~opReload()
{
std::cout<<"op destroyed: "<<this->inner<<std::endl;
}
template <typename T>
opReload<T> opReload<T>:: operator+(const opReload<T>& o1)
{
std::cout<<"Adding..."<<this->inner+o1.inner<<std::endl;
return opReload<T>(this->inner+o1.inner);
}
template <typename T>
opReload<T> opReload<T>:: operator-(const opReload<T>& o1)
{
std::cout<<"Minusing..."<<this->inner-o1.inner<<std::endl;
return opReload<T>(this->inner-o1.inner);
}
}# opReload.pxd
cdef extern from "opReload.h" namespace "OPRELOAD":
cdef cppclass opReload[T]:
opReload() except +
opReload(const T& arg) except +
opReload(const opReload[T]& o) except +
opReload[T] operator+(opReload[T]&)
opReload[T] operator-(opReload[T]&)
T getInner() - 上面引入的时候需要传入模板类的参数
opReload[T]& - 可以使用复制构造函数,使用方法是
oo = opReload[double](op1)
# distutils: language = c++
from opReload cimport opReload
def useClass():
    cdef double o1 = 1.5
    cdef double o2 = 2.5
    cdef opReload[double] op1 = opReload[double](o1)
    cdef opReload[double] op2 = opReload[double](o2)

    cdef opReload[double] o, o_, oo
    oo = opReload[double](op1)
    o = op1+op2
    o_ = op1-op2


return o.getInner(), o_.getInner() - 调用输出(main中只调用了pyx中的函数)
- 创建栈上的对象的时候,对象必须至少有一个无参数的构造函数,否则无法创建
在栈上和堆上分配变量
- 从
libc.stdlib引入malloc和free - 分配堆上对象
cdef vector[char]* v = new vector[char](10)
cdef char* strOnHeap = <char*>malloc(10) - 注意此处分配的动态
vector对象需要使用v[0]·解引用(类似于*v)才能使用,否则会出错类似于terminate called after throwing an instance of 'std::bad_alloc'# distutils: language = c++
from libc.stdlib cimport malloc, free
from libcpp.vector cimport vector
from libc.stdio cimport printf
def allocAndFree():
cdef char* strOnHeap = <char*>malloc(10)
printf("Alloced\n")
cdef vector[char]* v = new vector[char](10)
cdef int m
cdef char* strLit = "Hello"
for m in range(len(strLit)):
strOnHeap[m] = strLit[m]
cdef int i = 0
for i in range(10):
v[0][i] = <char>(int('0'.encode("ascii"))+i)
printf("%s\n", strOnHeap)
# printf("Alloced\n")
for i in range(10):
printf("%d", v[0][i])
printf("\n")
del v
free(strOnHeap) - 释放
malloc内存空间直接free即可 - 释放申请的动态变量使用
del使用编译好的C/C++动态库.so(Linux下)
- 参考
- c 源文件
calc.c
void calcFunc(int max)
{
int i = 0;
int j = 0;
for (;i<max;i++)
{
sleep(1);
printf("\r|");
for(j = 0; j<=i; j++)
{
printf("■");
}
for(j = i+1; j<max; j++)
{
printf(" ");
}
printf("|");
fflush(stdout);
}
} - c头文件
calc.h
void calcFunc(int i); - .pyx文件(注意导入的C库函数不可以被直接引用,需要在.pyx中包装一次)
# useCalc.pyx
cdef extern from "calc.h":
    void calcFunc(int i)
def useFunc(int i):
calcFunc(i) gcc生成动态链接库gcc -shared -o lib<输出文件>.so 源文件.c -fPIC-fPIC是生成位置无关代码的意思- 注意必须遵守命名规范
- 给出头
.h文件方便调用 - 但是直接使用命令行工具cythonize编译将会无法找到符号,报错
undefined symbol: calcFunc - 需要创建
setup.py指导编译和链接from distutils.core import setup, Extension
from Cython.Build import cythonize
ext_modules = [
Extension(
"useCalc", # the module name exposed to python
["useCalc.pyx"], # the Cython source file
libraries=["calc"], # the name of library to link with
library_dirs=["/home/frank/study/cython/use_So"], # the path to your library
)
]
setup(
name="useCalc",
ext_modules=cythonize(ext_modules, language_level=3),
) - 执行
python3 setup.py build_ext --inplace - 仍然报错
libcalc.so: cannot open shared object file: No such file or directory - 使用
ldd命令查看cython编译出的.so文件,看到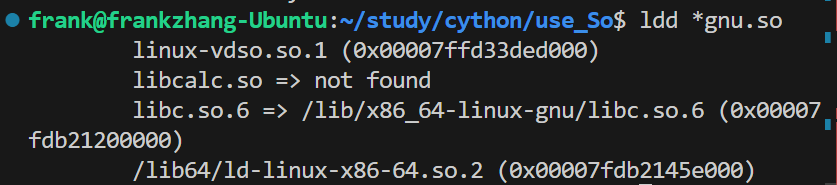
- 此时可见
libcalc.so是not found - 将库文件的目录添加到
/etc/ld.so.conf,使用vim编辑 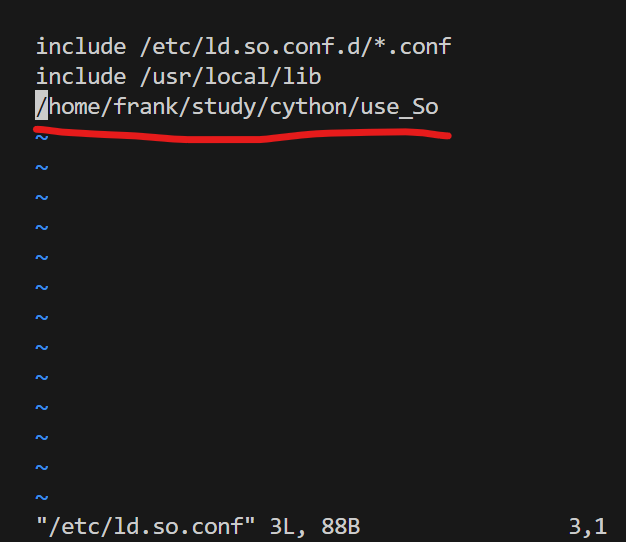
- 自己添加的目录前面不加
include
- 自己添加的目录前面不加
sudo /sbin/ldconfig使添加生效另:使用C语言如何调用动态链接库
int main()
{
calcFunc(10);
}- 引入头文件直接使用
- 编译的时候需要添加搜索路径
-L和添加自身库-l gcc -o main main.c -L. -lmylib-L.的意思是在当前目录下查找
- 同样需要在
/etc/ld.so.conf中添加并且执行sudo /sbin/ldconfig生效

提高代码执行速度
import time |
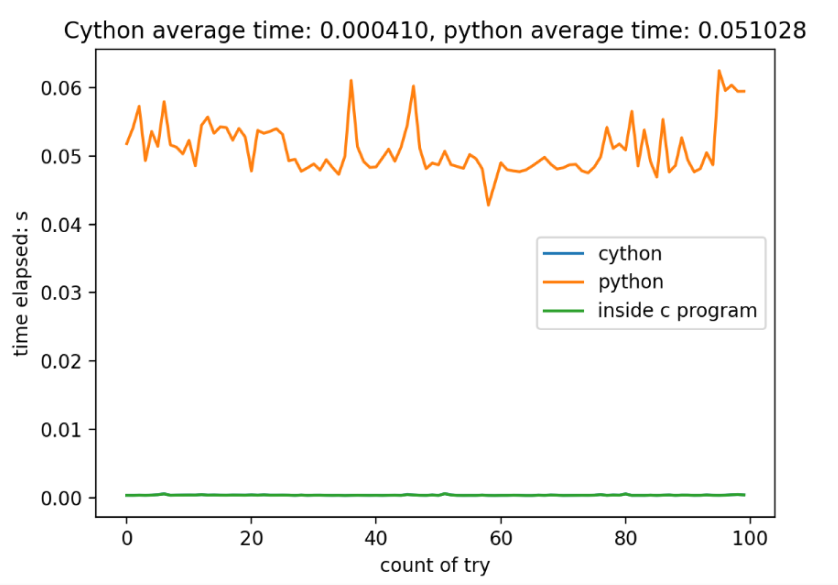
可以看出增加了类型声明,会使得函数性能有很大的提高
给
sum添加了volatile关键字cdef volatile long sum = 0,没有很大的变化如果将变量变为全局变量,则
还是并无明显区别,判断不是编译器优化导致的不同,快了124.46倍
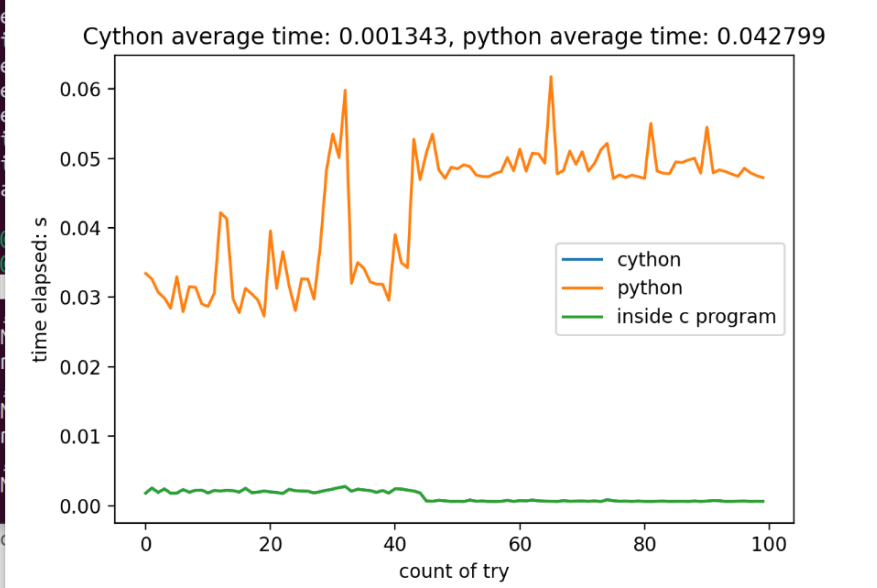
更换需要外部空间的计算,也是C程序快非常多
def arraySum(int m):
    cdef int a[1000000]
    cdef long sum = 0
    cdef int i = 0
    cdef int j = 0
    cdef double t1 = time.time()
    cdef double t2
    for i in range(m):
        a[i] = i
    for j in range(m):
        sum+=a[j]
    t2 = time.time()
    return sum, t2-t1
比较时间
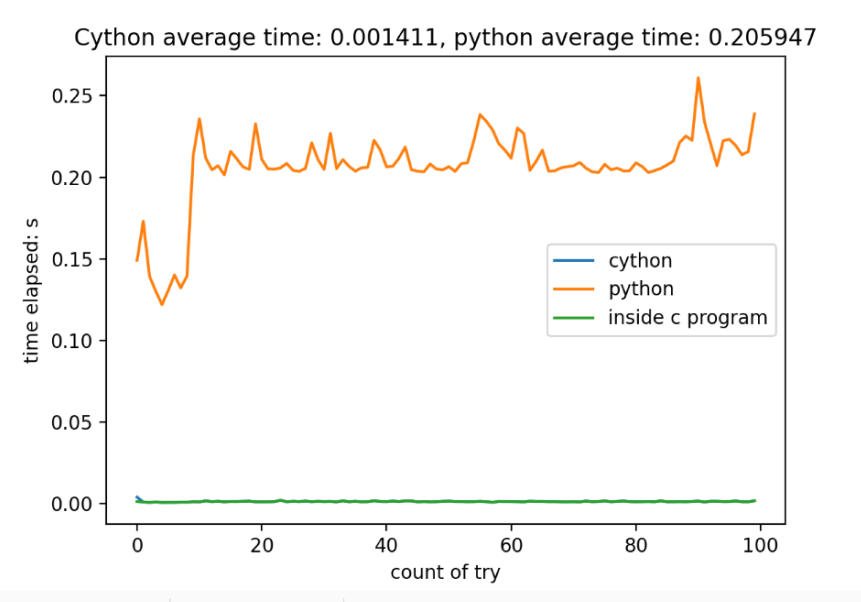
- 无论是在程序内部还是外部测量,可见二者时间没有明显的差异,都比python程序快非常多,基本上快了50倍左右
其他加速python程序的方法
- 参考知乎
可以给函数加缓存
lru_cache - 函数前加一个
@lru_cache() 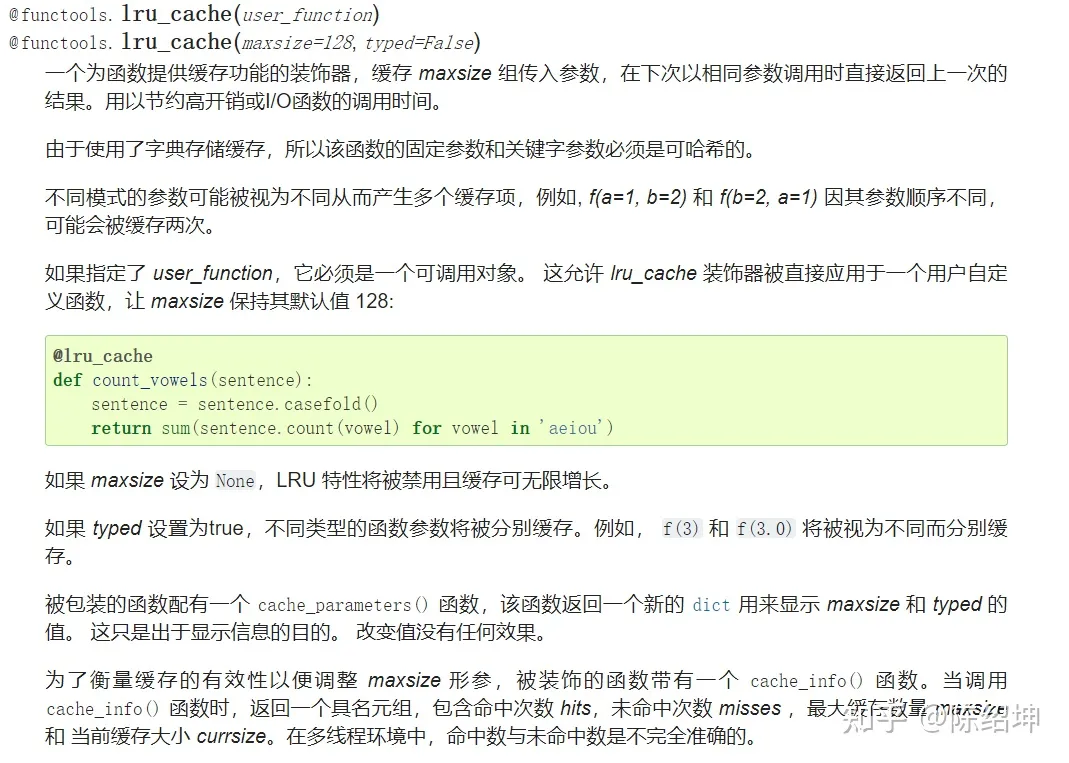
pypy解释器
pypy3 <代码路径>- 速度可以提高多倍
使用numba作为python的解释器
- 如果代码中有很多numpy数组或者循环,使用numba会提高效率
- 使用装饰器
from numba import jit
import numpy as np
x = np.arange(100).reshape(10, 10)
# Set "nopython" mode for best performance, equivalent to @njit
def go_fast(a): # Function is compiled to machine code when called the first time
trace = 0.0
for i in range(a.shape[0]): # Numba likes loops
trace += np.tanh(a[i, i]) # Numba likes NumPy functions
return a + trace # Numba likes NumPy broadcasting
print(go_fast(x))